Saturday, September 15, 2012

The project: Illustrating my first children's book

In February of 2012, I submitted my own manuscript and illustrations to Bronze Man Books.  It was my first illustrated manuscript and my first submission to a publishing house.  Two weeks later, Bronze Man Books asked if I might be interested in submitting sample illustrations for Marcy Blesy's manuscript, Am I Like My Daddy?, scheduled for publication by Bronze Man Books in Decatur, Illinois in December 2012.  At the end of March, Bronze Man books extended a contract to me, and I began a whirlwind 45 days in which I completed eighteen 8x10" color illustrations for the book.  Having wanted to illustrate children's books since I was a child, it was an offer I could not refuse!

Marcy's poignant story follows Grace, a girl whose father passed away a couple years before.  Through conversations with family members and journaling, Grace begins to piece together who her father was and the ways in which she is similar to him.  The story was very personal for Marcy, who also lost her father when she was younger; she details more about the story on her blog:  
and on her Pinterest Board:


My process of illustration for Am I Like My Daddy? began with conceptual drawings and photographing models for Grace and her mother. 
I hand-drew the illustrations with pencil and subsequently inked them with Pigma Micron pens. 
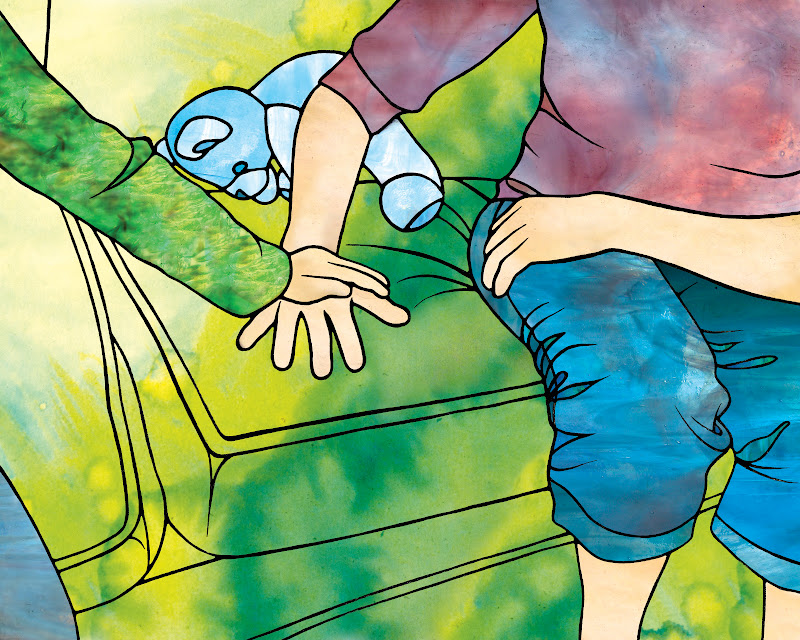
Each intersection between lines is contoured to resemble leading between stained glass panels. I then scanned and completed the illustrations in Photoshop.
After photographing the windows of Grace Episcopal Church in Anderson, South Carolina, I used the computer to "paint" the colors and textures from the stained glass into each "pane" within my drawing. 

The backgrounds of the illustrations are watercolors that I created with my children.  The one below on the right was painted by my two year old daughter.


Illustrations of Grace's "constructed memories" were then printed onto canvas, treated with watercolor crayons, sewn with a sewing machine, and re-scanned into the computer. 


In depicting Grace's personal and hopeful journey of discovery, I explored the support system of grief, in which parent and child support each other. Physical artifacts from her father surround Grace, and I used Grace's journaling to comprise the form of her father as she learns about him through loved ones' memories.


Interested in more information about the book?  Visit:
The following information is reprinted courtesy of Bronze Man Books:
Am I Like My Daddy? - $12
by Marcy Blesy
illustrated by Amy Kuhl Cox
ISBN 978-0-9819591-3-9 • 40 pages (6" X 8”) paperback © 2012
publication forthcoming
 in December 2012
Am I Like My Daddy? is an important book in the children's grief genre. Many books in this genre deal with the time immediately after a loved one dies. This book focuses on years after the death, when a maturing child is reprocessing his or her grief. New questions arise in the child's need to fill in those memory gaps.
Grace is a little girl who wonders if she is anything like her daddy. She uses the process of journaling to discover more about her deceased father.
The 40-page book is available for $12 plus $2.50 postage. This is a pre-publication order, with your book being shipped asap.
(Contact rbrooks@millikin.edu for special orders or quantity discounts.)

Thursday, August 23, 2012

A Banner for Grace Church, An Inspiration for Future Children's Book Illustrations


In the fall of 2010, the pastor at Grace Episcopal Church in Anderson, SC asked me if I could design a banner for the church.  Since the church is so much more than the building in which it is contained, he did not want the banner to contain an image of the church building itself.  Instead, he wanted to focus on the four gospels.  In the Book of Kells and other Medieval manuscripts, the four gospel writers (Matthew, Mark, Luke, and John) were symbolized as a winged man/angel, a winged lion, a winged ox, and an eagle.
Grace Episcopal Church has beautiful stained glass windows, and it was these windows that served as the inspiration for my banner.
My concept for the banner involved designing the banner to look as though it were a stained glass window in the church.
These shapes at the edges of all the windows were incorporated into the sides of the banner as well.
After I completed the banner, the local Anderson Independent Mail newspaper ran an article about the banner.
I also incorporated the symbols for the four elements behind the four gospel writers: water, fire, earth, and air.
My process involved drawing the design in pencil, then inking it with Pigma Micron pens.  Each intersection between lines is contoured to resemble the leading between stained glass panels.  I then scanned the illustrations so that I could complete them in Photoshop.  After photographing the actual windows in Grace Episcopal Church, I used the computer to "paint" the colors and textures from the stained glass into each "pane" within my drawing.
I uploaded my design to www.Spoonflower.com, an amazing resource in North Carolina that prints onto all kinds of fabric.  My finished banner was approximately 36" wide and 42" long.  Spoonflower was able to print my banner onto upholstery weight fabric.
After nine months of working on the banner, it was finally dedicated in the summer of 2011.
Best of all, the technique I employed for the project inspired me to illustrate a children's book manuscript in the same manner!
After sending my manuscript to Bronze Man Books at Millikin University in Decatur, Illinois in February 2012, I was formally invited in March 2012 to illustrate a manuscript that they currently had in production.  The book, Am I Like My Daddy? by Marcy Blesy, is scheduled to be released in December 2012.  Am I Like My Daddy? is already available for pre-order on Bronze Man Books website:  http://www.bronzemanbooks.com/books/AmILikeMyDaddy/index.html

Future posts will offer a sneak peak into the story and illustrations for the upcoming book!  


Sunday, July 15, 2012

Tutorial for Shrinkable Plastic Christmas Ornaments: A Perfect Project for the Kiddos


Three-Year-Old Self-Portrait: "Me with my hands in my pockets"
"Emerson-partner-Maggie in a crazy shirt"
"Mommy with a sixth invisible finger"
"Daddy in a tie-dye shirt" (he has glasses and facial hair)

I've posted on Shrinky Dinks before (I love them by the way), but now my son is getting into the action.

I had some Grafix ink jet printable shrinkable plastic (available on amazon.com) that I cut into squares and allowed my son to decorate with Sharpie permanent markers.  He decided to draw a portrait of each member of our family.  How perfect - and priceless - will these be as Christmas ornaments on our tree!?!

Be sure to punch holes in the plastic before baking (with a regular hole punch).  Follow instructions on package for oven temperature and baking time.  This is a fast project that can be completed in under a half hour.

My son also used this technique to make bookmarks and ornaments for his teachers as a holiday gift.  As he was only three years old at the time, I took the liberty of writing his message to his teachers onto the back of the shrinkable plastic before shrinking it in the oven!

Have fun with your holiday gifts this year; after all, you can't start too early!

Wednesday, November 2, 2011

November Gratitude Wreath Tutorial - A Visual Reflection of Thanksgiving

It is so important to foster gratitude in children from the youngest age.  
I was inspired by two pictures on Pinterest to create a way to document our family's thankful hearts.

The idea on this site:
inspired me greatly, but I also wanted to help my son reflect on what he was thankful for. 

I wanted to use a similar structure to another fantastic Pinterest find:

So, here's what I can up with!
First I bought 8.5" x 11" card stock and 1 12 x 12" piece of striped scrap booking paper from Michaels.
  I was planning on using the paper in my printer to let the computer do all the hard work with the numbers, but then I found these adorable, black, sparkly numbers called "Thickers" at Michaels.  
I couldn't resist...

Step 1: Cut out circles with an easy 2" hole punch. I used yellow, orange, peach, pumpkin, and ruby colored paper.


Step 2: Adhere "Thickers" to each circle.  I planned out the order of colors before beginning to adhere the stickers.


Step 3: Gather wreath supplies
12" round wreath form from Michaels
Pack of Wooden Clothespins (36 pack for $1 at Dollar Tree)


Step 4: Trace around circle of wire wreath form with pencil to have circle template to cut out on striped scrap booking paper.  
This paper will comprise the center of your wreath.


*NOTE*:Although I did not do this, I would recommend attaching this paper to the center of your wreath (with hot glue) before proceeding to the next step.  
I would also use this opportunity to attach a ribbon hanger to the top of the wreath to facilitate display.  (These were more difficult to attach once the clothespins were attached.)

Step 5 : Hot glue clothespins onto wire wreath form.  The two center circles provided a great place to attach the clothespins.  I wanted to have a place to record what our gratitude for each day of November.  Since November has 30 days, and the wreath has 6 segments, it was easy to glue 5 clothespins into each section.  After I completed the gluing, I clipped all 30 days onto the clothespins so that the colored circles formed a circle around the wire wreath. 


I staggered the circles somewhat so that the numbers would be most readable.  I chose to put all of the numbers so that they could be read right-side-up, rather than orienting them around the exterior.


Step 6:  At this point, I adhered "Thickers" to say "thanks" on the striped scrap booking paper (which I had already cut into a circle).  I hot glued the paper to the inner circle of the wire wreath from the back.  I also tied a ribbon to the top of the wire wreath to allow us to hang it on our front door or in our dining room. As I mentioned above, these steps would have been easier BEFORE I added the clothespins, but it was still possible at this point.


Step 7:  Next, I used a smaller circle punch to cut 30 circles from some lime green 8.5" x 11" card stock.


Step 8:  I placed Scotch tape on the back of these circles, attaching them in a staggered fashion to the body of the clothespins.  Upon these green circles, I will write what we are thankful for each day in November.  Because they are attached with Scotch tape, I can remove these circles at the end of the season and place them in an envelope with the year to save for my son.  Now he will know what he was grateful for at the age of three!  I may add other colors of the small circles to write statements of gratitude for my husband and myself.


Since I wrote "thanks" in the center of the circle, I just continued the sentence on the green surrounding circles each day. What was my son grateful for on November 1?
"...for our bones because I like our bones.  I am thankful for our body and our food and our puzzles."
...from the mouth's of babes.  :)


If I had it to do over again...  I'd probably print the numbers on the card stock to save money and not use the Thickers (*gasp*) even though they are so, so, so cute.  Why?  Because I would probably attach the numbers where the green circles are, and I'd use the larger circles around the exterior to have more room to record our expressions of gratitude.  If I did it this way, I could permanently attach the interior date circles with glue, and use the exterior clips for the thankful circles (to make removing them easier to do each year and to eliminate the need for Scotch tape at all)!

I hope that my tutorial will help you to record expressions of gratitude with your own family this holiday season!

Peace, Amy
www.amykuhlcox.etsy.com

Tip Junkie handmade projects
Related Posts Plugin for WordPress, Blogger...

Peace Montessori

Things I'm Reading/Making/Crafting/Doing

Support This Site